The insulation in my loft has been sadly lacking: it probably started off at 2″ installed in the 60’s but these days, with the amount of dirt that comes through the (un-felted) roof, along with other compression over the years, it is rather thinner in many places.
I have done heat loss calculations to try and work out how to prioritise my efforts. For example the front bedroom has a total loss of 1500W (not including ventilation losses) at a temperature difference of 25 degrees. Of this I reckon 710W is lost through the outside walls, 370W through the windows and 450W through the ceiling – so about third is going through the loft (arguably a greater proportion when the heavy curtains are drawn). So, as you’d expect, the loft is a good candidate for improvement.
I have decided to use a combination of a reflective vapour control foil, rockwool and finally a layer of Celotex PIR thermal insulation board, which should reduce the U-value from around 1.0 down to ~0.15.
I found it quite difficult to find advice on the best way to insulate your loft. By far the easiest, and what the professionals seem to do when upgrading your insulation, is to simply roll out a couple of new layers of rockwool over what was there before. The big drawback with this is that it makes loft access difficult as you don’t have anywhere clear to walk. If you try to move around stepping on the hidden joists you will crush the rockwool, gradually reducing its efficiency. In an un-felted roof it will also collect lots of dirt, also reducing its efficiency over time. Finally in my case I couldn’t see the point of leaving the virtually worthless and dirty fibreglass up there – every time you disturb it you get clouds of dust.
This is my new proposed insulation layout:
The idea is to have PIR board sitting on top of the joists – this appears to be strong enough to take a person’s weight if the load is spread using crawling boards. It also means that a further layer could be relatively easily added later if high fuel prices made it worthwhile.
Then, the space between the between the joists would be filled with rockwool. I did consider PIR board for that too, but decided that given that the joists are acting as thermal bridges anyway there probably wasn’t much point putting too much effort into this space. Also cutting the boards to fit all the joists would probably be tedious.
Finally I have included a reflective layer. With this type membrane it is important to have an air gap to enable the radiation to be reflected back towards the living space – in this case the manufacturer recommends a 25mm airspace.
The membrane appears to be relatively unusual and is something I’ve pondered for a while. Certainly the fancy new insulation materials, such as Tri-iso and clones, appear to make strong use of reflective surfaces.
Condensation, and the implications for wood rot, is the big concern with impermeable surfaces though. This occurs where warm air from the inside passes into the insulation and, as it hits a cooler surface, water condenses out of the air. For example, if you were simply to cover your existing fibreglass with an impermeable membrane, then the membrane would be cold and any warm air that had seeped up between gaps in the insulation would cause condensation on the inner surface of the membrane, i.e. trapped between the membrane and the wooden joists. Not good.
However with my design, any warm air that had passed the fibreglass would then hit the underside of the PIR panel anyway, another impermeable surface. Therefore it sounds best to me to keep warm air as close as possible to the inner surfaces of the building, hence put a membrane down directly on the lath & plaster. Then I started thinking about using some kind of foil, which finally led me to the VC reflective layer.
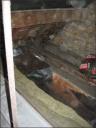
Here’s a photo part way through the first panel:
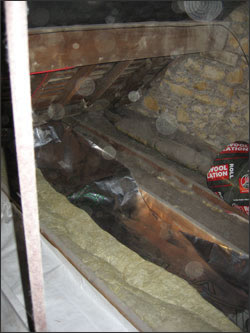
Note the leftmost joist just has the VC foil in place (white/top side up) , the second has the rockwool laid too and the third has the foil cut to size, ready to staple in place(shiny side down). The observant amongst you will spot the red ‘Firetuff’ cable used to connect up the mains interlinked smoke detectors – any wiring jobs are obviously best done before the insulation!
Finally here are a few observations so far:
- Manoeuvring a 2.4×1.2m board is difficult in the loft! To even get mine up there I split the board lengthwise into two by cutting it just short of the full depth (using a 10″ kitchen knife with the depth marked!) and folding it back on itself.
- Getting an even ~25mm airspace above the ceiling laths is pretty tricky. I cut strips of foil that were the gap width plus twice 50mm, stapled the foil about 25mm from the top of the joist, and then did a second row of staples further down. Even then sometimes the gap was more, sometimes less.
- Block up the ends of the airspace with rockwool as you don’t want cold air getting in.
Anyway, I hope this post is of interest. I’m sure it’s a subject I’ll return back to as my insulation work has only just begun – once I have removed the heating pipes from the loft, as well as rewired some electrical circuits that are still in rubber cable, I’ll be able to complete it properly including foil taping joints, sealing around the edges, etc. That could be a couple of years away though…
Oh, and best wishes for 2008 to all my readers (both of you!).

January 2, 2008 at 1:44 pm
Wow much more complicated than my modern house! I just went for the standard extra-in-the-loft plus cavity-fill deal.
I’m a bit concerned about this bit: “Block up the ends of the airspace with rockwool as you don’t want cold air getting in”. As well as that, and perhaps more important, you don’t want the warm air getting out. Specifically, you don’t want the water vapour from the interior diffusing into the rockwool between the joists, because then your foil isn’t acting as a vapour barrier at all.
So wouldn’t it be better to seal the ends of the airspace with more foil? I.e. run the foil down to the ceiling at the ends.
Maybe it’s a reason apart from cost that the professionals use wool throughout?
Cheers, Dave
January 3, 2008 at 1:25 pm
One further thought. If you replace a few of the PIR boards with rockwool, the vapour will have a means to escape and hopefully the condensation risk disappears. Perhaps use rockwool near the eaves?
Cheers, Dave
January 3, 2008 at 7:30 pm
Dave – Yes, I think you’re right about running the foil down to the ceiling at the edges – it’s a fairly approximate business anyway as the lath/plaster top of the ceiling is quite rough. I haven’t properly finished the edges of many yet and at the eaves I can’t get the PIR board in that far anyway so the foil will probably just sit right on the ceiling there. I don’t yet understand the thermal benefit of the foil but am thinking there must be something in it, plus with an old house any improvement to draft proofing is a benefit.
I have a post waiting to be finished about the U-value of this insulation: not allowing for thermal bridging of joists that’s coming out at 0.15, i.e. Part-L levels. This is one area I ought to be able to achieve a level equal to many modern houses since roof design hasn’t changed much. Of course insulating solid walls is rather more challenging…
January 11, 2008 at 2:27 pm
Three readers… very interesting blog – please keep it up
February 4, 2008 at 8:14 pm
I have had my loft insulated and want to board it out .the problem is the insulation is is about 12 inches thick and covers all the joists ,can i just sqaush this down and cover with board
February 4, 2008 at 9:07 pm
Alan – unfortunately you can’t squash the insulation and still get any benefit: firstly, by crushing the insulation you are both reducing its thickness and, I think, by forcing the air out, making it less effective. Secondly if you have boards nailed almost straight on top of the joists you’ll get thermal bridging across the wood.
My thoughts are if you just want to store empty cardboard boxes then a few large sheets of cardboard down on top of the insulation should spread the load and stop the insulation getting crushed too much. Any heavier and really you need to build a raised platform above the insulation. I have read on the web about other people doing this sort of thing but it does sound like hard work (plus you’ll need to be sure the ceiling joists are strong enough).
It is a tricky problem though and I’m surprised it’s not discussed more. I can only assume there’s a lot of squashed insulation out there 😦
Simon
December 24, 2009 at 7:49 am
Interesting article. I’m just about to re-insulate my loft – a terraced 1840 house. Have been pondering using a relective foil layer when I came across your article, You don’t say which brand of reflective vapour control foil you used. Also I wonder how this worked in the end and the final total cost? Do you think it was woth the effort in the end – fitting the foil that is?
January 2, 2010 at 7:50 pm
@hitman: I used a roll of VC foil that came from Screwfix – I think it was made by Protect (and looks like this product http://www.screwfix.com/prods/36995/Building/Roofing-Insulation/Protect-Insulating-Vapour-Control-Foil-1-5-x-50m ). I don’t have the spec sheet to hand, but didn’t have a way to judge its effect anyway – U-values don’t take reflective radiation into account. On the other hand, insulation must represent the most cost-effective way to improve the green performance of an old house and using a VC membrane should also minimise warm air movement (and so reduce the risk of condensation). The insulation is still work in progress (or not) as the CH pipes are still in the loft though.
January 2, 2010 at 7:57 pm
Actually there is some interesting information about the VC foil on the Glidevale website: http://www.glidevale.com/vc_foil.html – see this datasheet: http://www.glidevale.com/downloads/protect_vc_foil.pdf
May 19, 2010 at 10:30 am
[…] insulation – see earlier (once my CH pipes have gone I’ll be able to complete this […]